RELOOP KUT
Setup
Connections

- Connect your computer to the USB port at the rear panel of the Reloop KUT
- Optionally, connect each of your deck’s RCA cables to INPUT CH1 & CH2
If it’s a CD player, use any of the LINE Inputs
If it’s a turntable, use the PHONE Inputs. Secure the ground wire to a Phono Ground terminal. - Set the SOURCE selectors at the top panel to USB 1/2 - 3/4 so that the Mixer Channels to control a VirtualDJ Deck
- Set the MIDI switcher at the rear panel to ON
- Connect the KUT with AC power using the provided cable and power on the unit
Note: Usage of turntables or CD players (for DVS) is not necessary. The mixer may be used as a MIDI mixer and mix internally 2 VirtualDJ decks. VirtualDJ is also offering the ability to control all the software decks with even with a single timecode unit. See Timecode (DVS).
Drivers
Firmware: (for both Windows and Mac OSX computers). At the time this manual is written, no update for the firmware is available, but you should also check the product's official page for any updates at http://www.reloop.com/reloop-kut
Windows Drivers : Install the latest Reloop ASIO drivers from http://www.reloop.com/reloop-kut
Mac OSX Drivers : No driver is required to be installed. The Mac OS will install the necessary drivers once you connect the KUT to a USB port.
See Advanced Setup for further settings.
.
VirtualDJ 8 Setup
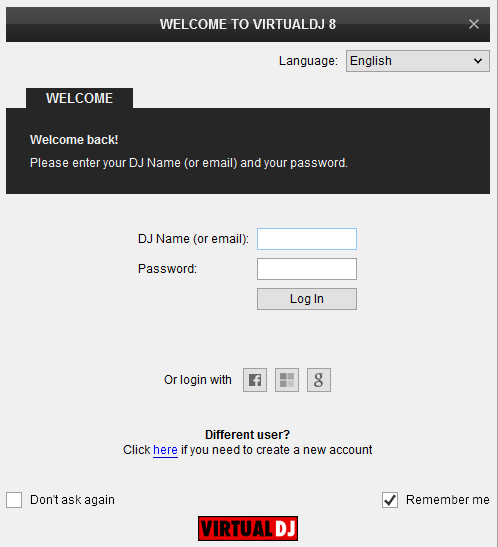
Once VirtualDJ 8 is launched, a Login Window will appear. Login with your virtualdj.com account credentials.
A Pro Infinity, a PLUS* or a Pro Subscription License is required to use the Reloop KUT. Without any of the above Licenses, the mixer will operate for 10 minutes each time you restart VirtualDJ.
http://www.virtualdj.com/buy/index.html
*For DVS Support an additional Timecode Plus license is required if the Reloop KUT Plus license is purchased.
Click on the “Use Soundcard” button and VirtualDJ will automatically create and apply the pre-defined audio configuration using the built-in audio interface of the Reloop KUT
Click to OK.
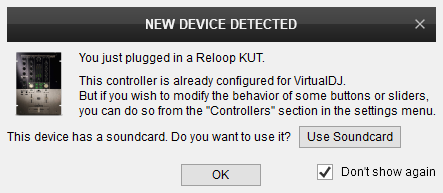
The unit is now ready to operate with VirtualDJ.
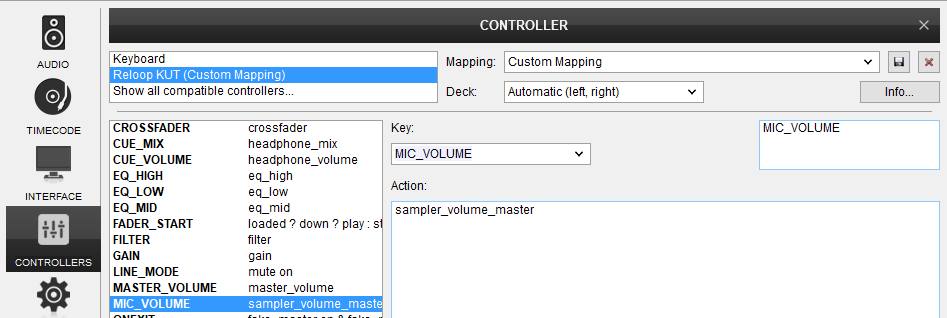
MIDI Operation
The unit should be visible in the CONTROLLERS tab of Config and the “factory default” available/selected from the Mappings drop-down list.
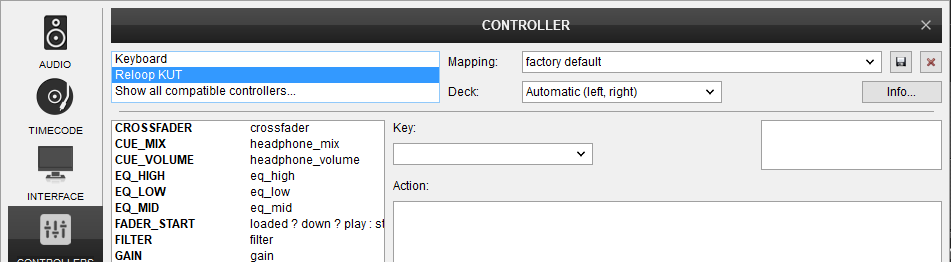
The factory default Mapping offers the functions described in this Manual, however those can be adjusted to your needs via VDJ Script actions.
Find more details at http://www.virtualdj.com/wiki/VDJ8script.html
AUDIO Setup
The unit has a pre-defined Audio setup and a special button in the AUDIO tab of Config to provide that. Alternative setups can be applied in the same window. See Inputs & Outputs for further details.
Timecode (DVS)* configuration is not pre-configured (see DVS Support for more details).
*requires Pro Infinity or Timecode License http://www.virtualdj.com/buy/index.html

For further software settings please refer to the User Guide of VirtualDJ 8.
http://www.virtualdj.com/manuals/virtualdj8/index.html
LAYOUT
Even though the Reloop KUT is capable of sending MIDI signals from all faders, buttons and knobs (if the MIDI switcher at the rear panel is set to ON), the entire unit is not controlling the internal mixer of VirtualDJ. The audio mixing is performed by the hardware.
The Crossfader, Equalizer, Filter, Volume faders etc. will move the relative faders of the VirtualDJ GUI, but not vice versa (Fake mixer mode)
The functionality of each button, knob and connection per section (as shown in the image below) will be explained in detail in the next chapters
A. Top panel - Mixer Controls
B. Front & Rear panel - Connections

MIXER CONTROLS

- CROSSFADER. Blends audio between the left and right assigned channels/decks.
- VOLUME. Use these faders to adjust the Output Volume of left/right mixer channel.
- CUE. Use these buttons to send one or more channel's pre-fader signal to the Headphones Channel for monitoring. When engaged, the button will be lit.
- CH FADER CURVE. Adjust the slope (curve) for the Channel Volume Faders. When the knob is at the maximum/right position, the Volume will smoothly increase/decrease when the fader is moved from bottom/top to top/bottom
- XFADER CURVE. Adjust the slope (curve) for the Crossfader. When the knob is set to the maximum/right position the audio blending between the left and right channels will be smooth. Set to minimum/left position to get a Cut near the edges of the crossfader (for Scratch DJs)
- XF REVERSE. Set this switcher to ON, to reverse the audio blending for the Crossfader (from right to left). Set back to OFF for normal audio blending (left channel to right channel) when moving Crossfader from left to right.
- CUE VOL. Use this knob to adjust the output volume of the Headphones Channel
- CUE MIX Use this knob to mix between CUE and Master MIX in the Headphone channel. When all the way to the left, only channels routed to Headphones (via the CUE buttons) will be heard. When all the way to the right, only the Program mix will be heard.
- FX SELECT. Use these buttons to select and enable a DYNAMIC FX (Phase/Flanger, White Noise, LP/HP Filter or Gate/Crush)
- DYNAMIC FX KNOB. Use these knobs to apply the selected Dynamic FX to left/right Channel. When the knob is at the middle position, no Effect is applied, even if its enabled from the FX SELECT buttons.
Depending on the selected Dynamic FX, moving these knobs to the left or right, a different Effect maybe applied (E.g. when the Phase/Flanger FX is selected, moving the knob to the left, the Phaser FX is applied, while the Flanger is applied when the knob is moved from middle position to the right) - 3-BAND EQ. Use these knobs to adjust the High (Treble) / Mid (middle) / Low (bass) frequencies of each mixer channel.
- GAIN. Adjusts the input audio level (gain) up to +9db of each mixer channel. No boost or cut is at 12 o’clock position.
- BOOTH VOLUME. Use this knob to control the Output level of the Booth Output (connection at the rear panel)
- VU METERS. The left and right series of leds indicate the pre-fader output level for the Left/Right Mixer Channel.
The middle series of leds indicate the Master Output level - MASTER VOL. Use this knob to adjust the Output level of the Master Output.
- INPUT SELECT. Set this selector to the appropriate position to define which Channel Input will be routed to the Left/Right Mixer Channel
Set to USB position to route Left/Right VirtualDJ deck output to the Left/Right mixer channel.
On PHONO/LINE position the audio signal from the Inputs at the rear panel) will be routed directly to the Output of this Mixer Channel. In this case the sound from the computer’s decks will be muted. Use this position to route external analogue media sources. - AUX/MIC/TALKOVER. Use this switcher to select either the AUX or the MIC Input as Source. The selected Source will be used for the MIC/AUX Controls below this switcher (described further in this chapter) and can be also routed as Input of the USB Audio interface to the computer.
When set to Talkover, the Master Output level will be reduced automatically, when signal is received from the Microphone Input.
Both AUX and MIC inputs are located at the front panel of the Reloop KUT - AUX/MIC VOL. Use this knob to adjust the output level of the MIC or AUX inputs signals, depending on the Input Source selected the switcher above.
- AUX/MIC HIGH. Use this knob to adjust the High (Treble) frequencies of the MIC or AUX inputs signals, depending on the Input Source selected the switcher above.
- AUX/MIC LOW. Use this knob to adjust the Low (Bass) frequencies of the MIC or AUX inputs signals, depending on the Input Source selected the switcher above.
- EQUALIZER PRESET. Set this switcher depending on the desired Equalizer mode. Choose between the Classic and The Kill modes.
Note :
The Mixer section of the Reloop KUT is assigned with VirtualDJ mixer actions (moving a mixer fader/knob at the KUT will also move the mixer elements of the VirtualDJ mixer on the GUI) but the "fake mixer" mode is enabled since the audio mixing is done by the KUT and not the internal mixer of VirtualDJ. This means that whatever adjustments are made on the internal mixer of VirtualDJ (e.g. moving a Volume fader from the VirtualDJ GUI) will not affect the audio routing or output.
FRONT & REAR PANEL
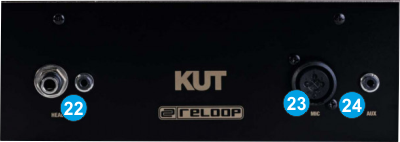
- PHONES INPUT Connect a pair of Headphones to these sockets for monitoring using either a ¼” or 1/8" plug.
- MIC Input. Use this Input to connect a Microphone using XLR or TRS 1/4" type of plug and route its signal to the Master Output when the AUX/MIC switcher at the top panel is set to MIC or TALKOVER. The output level of this input is controlled from the top panel.
- AUX Input. Use this Input to connect an external media source such as Phone, i-Pod, CD Player etc, using 1/8" jack type of plug and route its signal to the Master Output when the AUX/MIC switcher at the top panel is set to AUX. The output level of this input is controlled from the top panel.
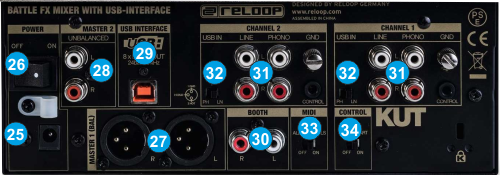
- POWER.INPUT. Connect the provided AC/DC Power Adapter to this socket and then plug the other end to an AC socket
- POWER.ON/OFF. After all the necessary connections are done, use this switcher to power on the unit
- MASTER OUT (BALANCED) Connect your amplifier using a pair of balanced XLR jacks. The level of this output is controlled by the MASTER VOL knob at the top panel
- MASTER OUT (UNBALANCED). Connect your amplifier using a pair of RCA cables. The level of this output is controlled by the MASTER LEVEL knob at the top panel
- USB Use a USB cable to connect the Reloop KUT with a USB port of your computer and allow the unit to send and receive audio and Midi signals
- BOOTH OUT Use a pair of RCA cables to connect the unit with your secondary output (e.g. for monitor). The level of this output is controlled by the BOOTH knob at the top panel.
- CH INPUTS. PHONO/LINE inputs are provided by RCA jacks (one for each Deck/mixer channel) to connect Turntables or CD Players. Use the PHONO/LINE switchers at the top of the panel to select a Source depending on the connected signal.
- USB IN LN/PH If DVS (Timecode) devices are connected to the LINE/PHONO Inputs, select LN/PH respectively for the timecode signal to be pre-amplified or not. When Timecode (DVS) is used, the Source selector switcher at the top panel should be at USB position.
- MIDI ON/OFF Set this switcher to ON, if you want the faders, knobs and switchers of the Reloop KUT to send MIDI signals to the computer. Note that MIDI is not necessary to be enabled for the unit to operate properly with VirtualDJ. When enabled though, the Mixer elements on the VirtualDJ GUI will follow the positions of the Hardware, thus Video mixing and recording will be properly working.
- FADER START If Fader Start is enabled from this switcher, the Left/Right VirtualDJ Deck will start playing automatically if the Volume Fader is moved from the minimum position to any other and automatically stop at the last Cue point when moved from any position to the minimum.
INPUTS & OUTPUTS
The Reloop KUT offers a built-in USB Audio Interface with 3 Stereo Outputs and 4 Stereo Inputs, suitable for Timecode (DVS), internal recording, importing external audio sources to VirtualDJ and dedicated Sampler Output.
TIMECODE (DVS)
The Reloop KUT offers dedicated USB Audio Inputs, suitable for Timecode Control (DVS), and those are pre-defined by default, as per the sound configuration offered by the special button at the top of VirtualDJ Audio setup window.

See further details for Timecode in VirtualDJ Manual at http://www.virtualdj.com/manuals/virtualdj8/settings/audiosetup/timecode.html
Timecode lines can be manually removed from the above Audio Setup, if no Timecode Controls are used
The same Inputs can be used as Line Ins, to import external sources to a VirtualDJ Deck and apply effects to their signals. Read further information about Line Inputs in VirtualDJ Manual at http://www.virtualdj.com/manuals/virtualdj8/settings/audiosetup/linein.html
AUX INPUT
An additional USB Input Channel (Chan 6,7) is offered from the Reloop KUT, which routes the audio signal from the AUX Input (connection at the front) to the Audio Setup of VirtualDJ. This input is not pre-defined in the default sound configuration, and if needed, needs to be manually added as per the image below.

MICROPHONE INPUT
The Reloop KUT offers a Microphone Input (connection at the front panel). Its signal is routed directly to the Master Output and its volume can be controlled from the top panel as well, if the AUX/MIC Switcher at the top panel is set to the MIC or TALKOVER position.
Note that this input is not part of the USB Audio Interface, cannot be included to the Audio Setup of VirtualDJ, nor the MIC section in the VirtualDJ GUI controls the Microphone (and vice versa).
SAMPLER
Sampler of VirtualDJ is routed to a special Output of the Reloop KUT (Channels 5,6), and this is pre-defined by default. This special mixer output offers the ability to output Sampler even if both Channel faders are down. The Output Volume of Sampler can be controlled via the sampler_volume_master VDJ action, and this can be assigned/mapped to a custom knob on the GUI of VirtualDJ or even any other knob on the KUT if not used by Hardware. E.g. if no Microphone or Aux input is used, the AUX/MIC Level knob can be used for this purpose.
RECORDING
The built-in USB Audio interface of the Reloop KUT offers a dedicated Record Input which is part of the default audio configuration at Channels 7,8, offering the ability to record you mix along with any other Input coming from Microphone, Auxiliary or Line/Phono Inputs.
Read further about recording in VirtualDJ in the VirtualDJ manual at http://www.virtualdj.com/manuals/virtualdj8/interface/mixer/masterpanel.html

[